Sunday, December 20, 2015

1 : 2


Originally the car was setup with 10K front springs and 12K rear.  Used in combination with staggered 225/195 Hankook tires, the car actually worked quite well but exhibited a lot of body roll.  With the newer RE71R tires and a 'square' setup, the car decided not to turn as well anymore.

Next we tried 650F and 900R.  This was supposed to combat front roll and also add rotation.  Actually made it worse.  Lots of front push, even with the FSB removed.  Realigned the rear with less camber, positive rake, and toe-out but results were still about the same.

Went back to the 10K (560) front springs and left the 900 in the rear.  Not working as expected; still pushy even with the goofy rear alignment and stiff RSB.  This is the combination I used at 2015 SCCA Solo Nationals.

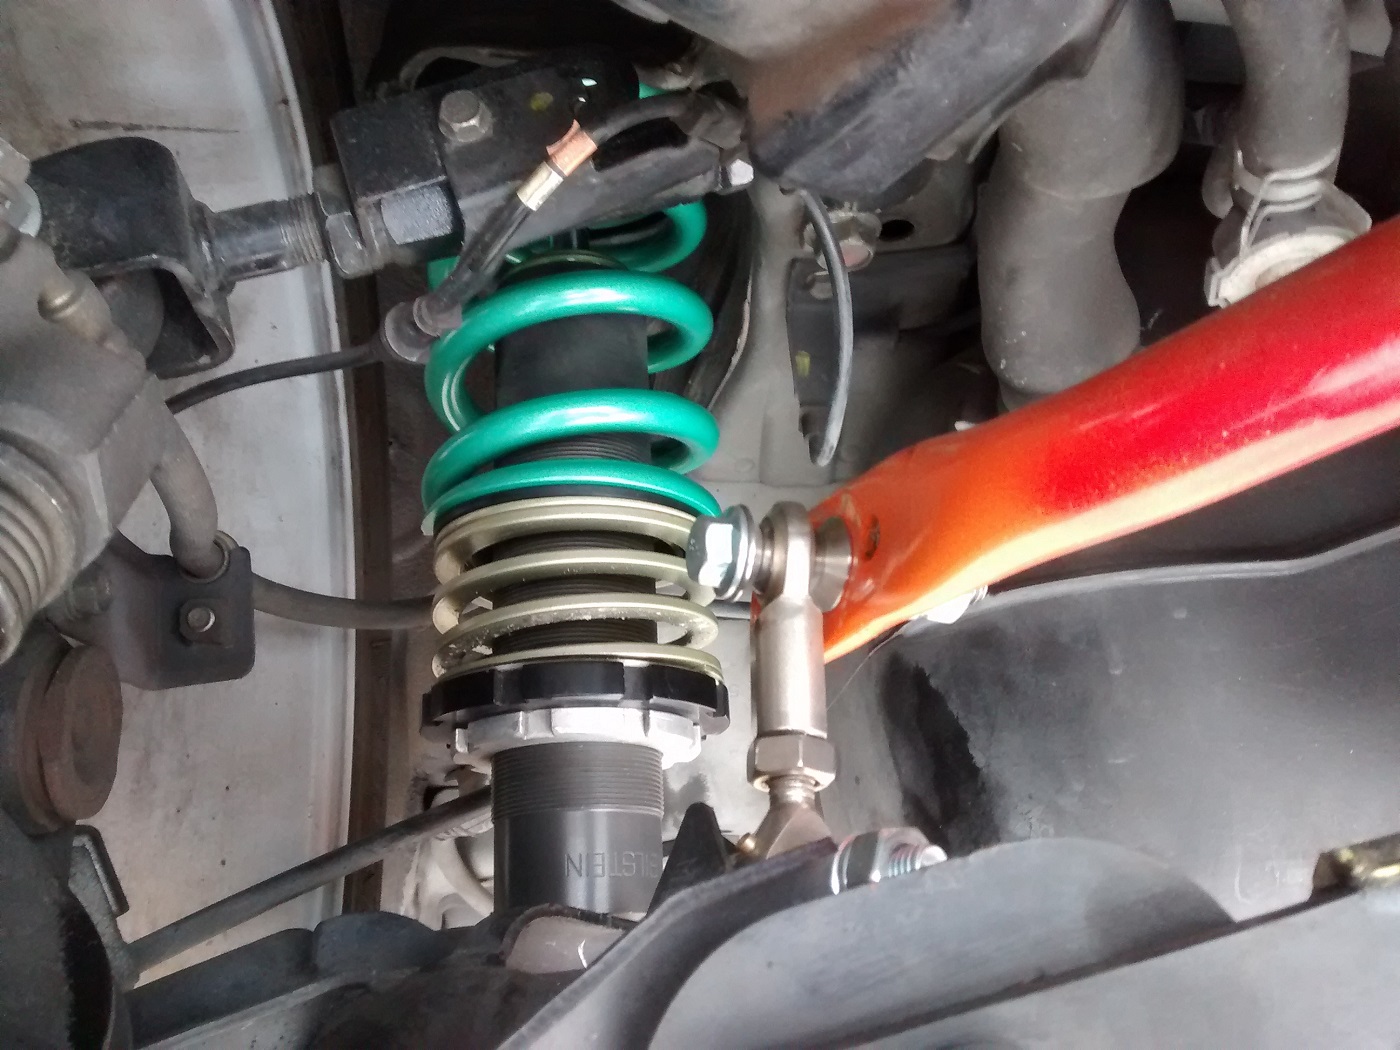
Finally decided to go with a 1:2 ratio with the 650 front and 1300 rear.  The new rear springs are 2.5" ID Hyperco so modified upper spring mounts and new lower perches and helpers replace the old 70mm ID stuff. Yawsport valves the Bilstein ASN shocks and also makes custom attachment points for the swaybar endlinks on the LCA. With a slight reverse rake and soft swaybar setting the car performed excellent at our year-end autox on Qualcomm's low grip surface.


My original idea to go with big rear bar/soft springs changed when I could find no easy or economical way to get the speedway bar routed around the exhaust and LCAs without custom fabrication.  Fortunately the large spring/moderate swaybar setup is initially working well and seems to be more linear and predictable at the limit.


Rear UCA to frame clearance and LCA to swaybar clearance are both close but modeling clay reveals no interference.  Plenty of room at the LCA/swaybar with the swaybar mounting brackets pushed up almost as high as they can go and with the end links extended to near maximum- almost 5 inches.  The UCA/frame clearance is about 1/8" left and 1/4" right.  Some adjustment of the main center link and jam nut could gain another 1/4" clearance if needed.  The current rear ride height is the lowest to date with no plans to go lower


Conclusion:  Start with at least a 1:2 spring rate bias and try to eliminate any bushing deflection or dynamic toe by replacing all the rear control arm and knuckle bushings.  The ultra stiff rear springs will greatly reduce unwanted suspension movement and make the handling more predictable.  My rear bushings are still the original OEM and probably a major contributing factor as to why the mild to moderate spring changes did not produce the desired results.


Friday, October 30, 2015

5102 Aksarben

   Late update, but 2015 SCCA Solo Nationals turned out about as I expected - fierce competition resulting in a distant second place finish.  No complaints though; drying conditions and cone trouble forced a mildly conservative final run each day and the pushy car setup kept me far away from the top spot.


After some good results from the Kumho V720 tires locally and at the Pro Solo Finale, I chose too run the Kumho at Nationals also.  The V720 gives immediate response and super quick turn-in.  Puts down power very well too.


Fastrack was released last week and the RSX Type-S will not be moved to STX and will remain in STF.   Time to open up the checkbook and start thinking about spending money again.

California emissions check (SMOG) was required for registration renewal which meant that I had to replace the complete exhaust and intake to legally pass the visual test. Easier than it looks and I'm good for another two years.  Yay.


First on the to do list is to lengthen the integral strut steering arms, as my OE spec Bilsteins are designed for a Civic and thus the steering arms are about 1/4" too short.  Yawsport has their welder do his magic and cut and space the arms 8mm to meet the correct dimensions.  While the struts were out I re-installed the 650# front springs and replaced some of the spring thrust washers.  Front swaybar was removed and front ride height is lowered 1/4".


Second is to keep an eye on the rear upper control arms.  These aftermarket arms allow for camber adjustment, but at reduced ride height the inner most part of the arm can come in contact with the body/subframe.  If the threads are long enough, it looks like I can thread the center outward and pick up a little space.  May need custom offset arms or a different brand?  Modeling clay comes in handy for checking clearances such as this.


At the first local autox after Nats I play around with the rear swaybar and discover that it is only set about half-stiff.  It is also bound up in the brackets and will not move by hand.  I thought the bar was maxxed out for Lincoln but I may have  adjusted it for wet weather conditions.  Whoops.  And the binding is due to poor lubrication and overly tight bushings.  Placing small spacers between the brackets and subframe eases up the bushings and allows easier rotation with the help of proper grease.

 While doing the strut mods listed above, I was driving the car for a week with stock front springs and I could really feel the softness of the rear suspension, as it should be with a motion ratio around .59.  My co-driver helps me find some 18K (1008lbs) Tein springs.  I am wanting at least 1200-1300lb, but these Teins are the correct 70mm ID and priced well at $40.

A broken wheel stud keeps me out of the car the the most recent local autox.  Bummer.  I have extended ARP studs but the front replacement requires hub removal and bearing replacement which is something I would need to have a shop fix.  $$$   Maybe later.  So I replaced it with a stock length stud.


Next up ?  Keep competing locally and increase real roll stiffness.  Saving weight and getting cold intake air to the engine are also on my radar.  More front camber and travel too. Rear suspension bushings.  All of this on the cheap, of course.


Monday, August 31, 2015

Zero Time

  Three days remaining until I leave for SCCA Solo Nationals in Lincoln, Nebraska and the suspension is not working as well as I like.  I have gone back to the softer 10K front springs and the rear is still equipped with the 16K springs while the Hotchkis swaybar is maxxed out beyond it's design capabilities. Professional alignment at Lutz Tire with zero toe all around and less rear camber (-2.70).   Ride height is also raised about 3/8" all around to help give more front strut travel. At the most recent El Toro autox, this setup seemed nervous at the limit- probably due to toe- but still would not sweep well or rotate.

   In a last ditch effort to get more rotation and/or lift-off oversteer, I raised the rear ride height about 1/2 inch for our last local autox before Nationals.  That seemed to do the trick - the car turns better than it did and now rotates off throttle, but still feels awkward.  Not as smooth or predictable as I would like, but that is probably due to the toe which should have increased out as the rear ride height was raised.


  Now, I know what you are thinking;  stop screwing with the rear and focus on getting the front to actually turn better instead.  Valid point and I am (slowly) working on that too, but some of the front understeer you may notice in the videos is because the rear will not come around so I turn the steering wheel more which makes it worse.  My main reason for recently going to the stiffer springs on all four corners was to allow a lower ride height to reduce the COG and minimize camber loss and body roll which should help the front grip.  Of course I know I need more front camber but that is another issue.

   Unfortunately, the spring changes I made six weeks ago to actually make the font bite better and help the rear rotate did not produce the results I expected and I panicked.  Spiraling out of control, the car setup has been different for each of the last 5+ autox events, usually on different brand tires too.

   So be it. I will take what I have to Lincoln and drink beer and have fun.


Again this year Rick from Ciro Design arranged a transporter for the journey to Lincoln.


Friday, July 24, 2015

New and Somewhat Improved

  I do not like making car setup changes this close to Solo Nationals, but with trying to get the 225 BFG Rival S to work better on my car I needed a stiffer and/or looser setup.  And regardless of tire make, the front suspension was too soft anyway and needed more roll stiffness for faster transitions.  Up on spring rate 90# front, 225# rear (650F, 900R).  After calculating the motion ratios this should give slightly more rear spring bias to help rotation.


At this first autox test event I had some unexpected ignition cutout problems that prevented good solid runs, but we were able to get an OK feel for the car's balance.  With the rear swaybar set full soft and flat rake the car is quite pushy.  So we disconnected the front bar and tried a couple more runs and it felt better but still far from ideal.  The BFG tires are so vague and delayed that most of the initial understeer and slow transitions are probably due to the tires as the Kumho and RE71 respond alot quicker.  Rear spring installation required unbolting the front LCA mount which can alter the alignment.  Toe plates reveal 7/32 rear toe in; this could explain some of the pushyness but it is not far off from what I had set originally.  Next event July 26 and the rear swaybar settings will be much more aggressive and return rake to 1/4" lower in the front.  Professional alignment TBD.


First impressions with the new setup;  slight improvement transitionally and the front strut travel is greatly reduced to the point where I can lower the front more without fear of totally mashing the bumpstops.  However, power down was not as good with the BFGs spinning more than ever, especially on their first run (warm 75* day). The rake and bar settings should help this situation and I already noticed a power down improvement after disconnecting the front swaybar.  Car corners much flatter now too so I may need to revisit camber and tire pressures.  ABS seems to want to kick in sooner and/or more often.

Downsides?  Yes, the ride on the street is worse and I don't think I could tolerate any more spring rate increase for this daily driver.  And with the ability to lower the car more, exhaust clearance becomes more of a problem.  Lower ride height also causes more bump steer.

FSB:  It is still on the car with one side disconnected.  One more event will determine if it stays or goes entirely.  Small, but effective enough to make minor setup changes.  Hope to rework it for more ground clearance and multiple adjustment settings.  With an LSD this swaybar could be more of a benefit.

The cutout problems I experienced at this test event first showed up during the Shootout rounds at the Utah Match Tour, possibly forcing me to lose in the third round.  I assumed it was fuel starve or something similar because it only happens during hard cornering.  Turns out the problem is related to my additional oil pressure sending unit and the configurations in the Kpro software.  Oil slosh and incorrectly scaled values were causing the advanced protection to cut ignition.  Lets just say that the V4 Hondata Kpro software still uses most of the V3 embeded help files so I was not aware of all the features and how they may react.

Speaking of the Utah Match Tour, I enjoyed the format and had fun despite the brutally hot temperatures and 4000+ ft. elevation.  I had cone troubles but still was outpaced by the well driven Honda Fit on RE71R tires. I purposely chose to run the Kumho tires based on their feedback and early performance versus the BFG.  Downshifting to first at the hairpin was key to a fast time but my transmission does not agree.


Five weeks to go before Nationals and I need to make the car turn easier and then also decide which tire is better/faster/easier to drive with the revised setup.  The Bridgestone is my primary tire choice at the moment because it puts down power best, sets quicker, and communicates very well.


Wednesday, June 17, 2015

Numbers & Crush

The most common questions I get asked about the RSX is how much power does it make and what are the spring rates?

K20 horsepower figures are commonly known and all over the internet.  200 wheel horsepower is widely accepted for a naturally aspirated K20a2 with I/H/E and a good tune and torque is generally below 150 but relatively flat from 3K to redline.  My car dynoed at 194hp / 147tq with a big jump in power over the stock tune and a much safer AFR.


Spring rates are currently 10K front and 12K rear.  The metric conversion is basically x56 so the fronts are 560 lbs/in and the rears are 672 lbs/in.  Way softer rates than what the internet says you need to have to make an RSX work properly and softer than I would like for autox but it is a good choice for this daily driver.  Rear motion ratio is .590 and the front is close to 1 so you can see the calculated wheel rates are actually softer in the rear.  With minimal rear toe and normal rake the car has no problems turning but cannot be classified as eager or willing.  Steady state push and slow transitions can be helped with more spring rate and higher rear bias, but that can hurt power application and be detrimental on bumpy surfaces.  Higher spring rates are in my possession and more changes are planned.


In anticipation of rear spring changes, I modified the rear swaybar by crushing the tube further back and adding another adjustment hole.  Not the most beautiful thing, but when combined with an alternate LCA endlink mount it will give much more adjustment opportunity and better articulation.


The new billet aluminum swaybar brackets are much stronger than the generic steel ones. Video shows the only deflection is from the thin urethane bushings, however if you observe closely it looks like the bottom half of the subframe is flexing. Maybe time to revisit the full width ASR subframe brace again.  Modeling clay on the lower control arms tells me how much clearance to the swaybar arms.


Wednesday, June 3, 2015

Rear Swaybar, Again


  Watch the video above and you can see the steel rear swaybar mounting bracket flex under load.  Some research shows that this flex is a common problem when using these universal brackets and they are prone to break or tear when using high rate swaybars combined with aggressive driving.  Stronger aftermarket brackets are available in various designs and materials and I chose to buy a pair of heavy duty billet aluminum brackets from James Barone Racing.  Prothane 1 1/4" urethane bushings are included for use with a planned Speedway bar and I also picked up a pair of 27mm bushings to use with my current Hotchkis swaybar.


Extreme example of what can happen.


The subframe mounting surface for the swaybar brackets is not completely flat and I also need to add more space for shaft collar clearance so I got an ASR rear subframe brace to help the situation.  The ASR brace is a 3/8" flat aluminum transverse plate that sandwiches between the rear subframe and swaybar brackets.  Mostly bling but very popular in the Honda world and widely available at reasonable prices.


Must be defective?  The brackets hang over the edge by at least 1/4", so I swap it out for a different one.


Nope.  Only the oem bracket is flush with the brace, but even that one the bushing still hangs over the edge.


My original idea was to simply cut and drill some scrap aluminum to make the spacers but I thought the ASR brace would be a better fit.  It does look good and offers a little strength to the mounting surface, but please...   Back to Plan A.  I will need to add another 1/8" spacer when using clamping collars with a 32mm bar.


So why not just buck up and buy the complete ASR 32mm swaybar kit instead of messing around with these odd brackets, braces, bushings, etc ?


I am not convinced that the swaybar arms provided with the kit will clear the RSX lower control arms when installed on a lowered vehicle. I have noticed notched swaybar arms and lower control arm interference when using this bar design and with all the misinformation on the internet forums and crappy parts available I cannot take the chance on buying a $600 swaybar and not being able to get a refund or return when it doesn't do what I want or meet my expectations.  And if I need a different sized center section I am out another $125+. It is also advertised to pretty much not fit with any full length exhaust which means more money to modify the tailpipe, which I already have modified to clear my current Hotchkis bar.  Also, the arm endlink holes are positioned in a way that requires endlink length adjustments when arm hole changes are made. (See Karcepts for an example of how to do it better.)

Now I don't necessarily want more rear bar stiffness, but I like the Speedway modular design's wide range of adjustability and ease of use. Similar to the front swaybar I built, I am slowly piecing together a rear swaybar that will use the existing subframe bracket mounts. Will need to have custom shaped arms with enough curve to safely clear the LCA.  If I can ditch the rear muffler section a trunk mount swaybar would be easier because the arms could be straight and attach to the backside of the LCAs.


Oiling

   Well, my diagnosis of the PCV system being my cause of the oil ingestion and resulting smoke show and power loss is wrong.  The problem is the breather tube that connects between the valve cover and intake pipe. Previously the problem was only showing up mid-session at a ProSolo where the engine had time to cleanse itself before I could make a good diagnosis.  However, at the most recent CSCC autox the problem came back so I immediately removed the suspected intake hose when I got back to grid and found oil pooling.  Just for good measure I checked the PCV hose and catch can too but all was clean and dry.


  The problem hose and fittings require a 19mm ID hose so modifications to the hoses and/or catch can would be needed to fix this.  Instead, I bought another ebay special oil catch can with the proper sized fittings and hose.  More money spent- yes - but no need to screw around with reducer fittings or whatever.  Plus, I can keep the original catch can in the PCV circuit if I want.


The oem breather hose design with its integrated water bypass pipe loop needs to be retained and without lengthening the water hoses it is pretty much stuck near its original location at the valve cover.  Keeping it simple I add one straight coupler and complete the circuit with the provided silicone hose. I reuse the mounting bracket and hardware from the old pcv catch can.


Knowing now that the oil can do funny things within the block has me more concerned about oil pressure and baffling.  The RSX's only oil sensor is merely a pressure switch that tells the computer it is safe to activate VTEC (over 50 psi or so) or turn on the idiot light because the pressure is below 10 psi.  A simple aftermarket oil pressure gauge is an easy solution but it is not practical, easy, or safe to monitor a gauge while competitively driving.   Defi makes a gauge kit with a recall or memory feature, but the cost and complexity is not what I want just for one sensor.  The Hondata Kpro ecu is equipped with inputs that can monitor and datalog such critical items, but a new sending unit or transducer would be required to get the proper signal into the ecu.  Ebay wins again and I buy a 100psi pressure transducer and BSPT adapter.


The new oil sensor install and wiring is basic stuff and then with a few ecu setting changes I can monitor and datalog oil pressure.  Biggest drawback is that I lose the oem oil idiot light, but Kpro has some advanced settings with several different actions that can warn the driver and/or protect the engine under preset conditions.  


Wiring colors:  +5v Grey/Red,  Signal Purple/Red.  Ground Orange

Next is to datalog at autox and see how oil pressure is affected and the results will determine how soon a baffled oil pan is required.


Wednesday, May 6, 2015

Progress

  Some help from Abe's Garage and we found a solution to the camber plate fitment problems.  A few minutes on the mini-lathe and a new spacer is machined for placement on the strut stem between the upper spring seat and bearing plate.  This allows an extra bit of clearance so that the seat does not interfere with the upper strut tower hole or any of the lower ring bolts. Strut stem side clearance to the center tower hole is minimal, less than 1/4", so I presume I am near the maximum caster limit with this design.  The strut mounting bolts were welded to the lower support ring to allow easier installation.  Bump travel is increased about 3/4" but then the ride height is lowered about 3/8" for a total net gain of 3/8" bump.  Toe appears to be close to zero and caster should be improved but a professional alignment will come next week or asap.


This top-mount design puts a lot of stress on the strut towers and more load through the hardware compared to the stock mounts.  Next step is to make a full circumference spacer and possibly upgrade the hardware.  Would also be nice to somehow incorporate a strut bar for reinforcement.  Just gonna drive it for now and see if any weak spots show up.


  My recently replaced exhaust manifold gasket started leaking again so I knew something was wrong.  A quick look revealed a blown out gasket and carbon deposits all around cylinder #2.   Header removal and straight edge check shows a low spot at the header flange around runner #2.  Abe's Garage has a big selection of tools so we whip out the belt sander and go to work.  Add a new gasket and all is quiet again with the OBXv2 race header.  I bought this header used and it always had a slight leaky tick when cold; must have been a manufacturing defect or a previous owner problem.


Good news:  I finally have a second full set of 15x7.5 5x114.3 Rota Slipstream wheels.  The bad news is that the last 2 wheels I bought have a different offset, +40.  All the others are +35 and barely clear the front brake rotors.  A test fit with the new +40 wheels and there are no problems . I bought some 5mm spacers just in case I need more inside clearance between the strut and tire.


Monday, May 4, 2015

Caster Plates DIY

  Nothing fancy, but good enough for my budget.  Generic pillowball centers (the same bearings as used in my existing ebay camber plates) bolted to 3/8" aluminum plate.  The lower support ring is 1/8" steel with M10 hardware and steel standoffs -  similar design to the Hotchkis and Noltec plates.  Not intended to be slotted but it was easy enough to do while the tools were out.  The slotting is strictly front to rear for caster changes only and the camber is minimal and fixed at the plate.

Test fitting onto the Bilstein struts and there are minor clearance issues that will need to be sorted out before final assembly.  Some strut stem spacers are needed to move the upper spring perch down away from the tower, and the standoffs need to be about 1/8" taller to give room for the bearing assembly bolts to clear the raised lip on the strut tower hole.


The goal of these plates is to maximize caster and allow more strut travel.  I hope to gain almost an inch of strut travel and then reduce ride height by half that.  Caster will be improved a little, but by how much I am not sure as it depends on the tie rods and strut tower hole clearance.

Plans to have these installed and tested for last weekend's autox was a fail and time is ticking.  Future suspension development and tuning mostly relies on this project as I want to play with the ride height and rake before making another spring / swaybar change.